Video tutorial and pattern
Pulsa AQUÍ para ir a la versión en español

Materials
- 3 mm crochet hook
- Yarn I used: 40% acrylic 60% cotton
- Scissors
- Wool needle for finishing the final strand
- Raffia or another similar type of cord
- Wooden beads or any decoration to attach to the bottom part
-
- 🔨 You can see the materials I use to make my amigurumis HERE
Stitches used are:
- Single crochet (sc)
- Decrease sc2tog
- Increase (inc)
- Chain
- Slip stitch
Video tutorial
Here you have access to the video tutorial whether you are left-handed or right-handed, below you have the pattern.
You must click on the settings to activate the subtitles.
Pattern
✅ If you want to share this pattern, please, please pass on the link to this page.
Let's start!
First side heart
Row 1: Make one chain of 11 stitches
Row
2: In the second chain make 1 increase (an increase is 2 sc in the same stitch), 9 sc and at
the end, make a chain in the air and turn to crochet on the back side. (11p)
Row
3: Starting in the first stitch, make 10 sc (pick up the entire stitch, not
just the front part), 1 increase in the last stitch (this last stitch is a bit
on the side), chain one, and turn. (12p)
Rows
4 - 5: Starting in the first stitch make 12 sc, chain and turn in each row.
(12p)
Row
6: Starting in the first stitch decrease by making "2 single crochets
together", (kwon as sc2tog), 10 sc, chain and turn. (11p)
*
How to do the 2 single crochets together - Insert the hook through the first
stitch (the entire stitch, not just the front part), yarn over, do not complete
the stitch. Now you have two loops on your hook, go to the next stitch, insert
the hook, and yarn over. You have 3 loops on your hook, now finish by yarn over
and pulling it through all 3 loops on your hook to complete the decrease.
Row
7: Starting in the first stitch make 9 sc and 1 dec (the decrease just like the
previous one, taking 2 sc together), chain and turn. (10p)
Row 8: Starting in the first stitch make 1 dec (same as the previous one), 8 sc, chain and turn. (9p)
Row 9–10: Starting in the first stitch make 7 sc, chain and turn in each row.
Row 11: Starting in the first stitch make 5 sc, 1 dec (same as the previous ones), chain and turn. (6p)
Row 12: Starting in the first stitch make 1 dec (same as the previous ones), 2 sc and 1 dec (same as the previous ones). NOTE: We don't make a chain to turn; we turn without making a chain. (4p)
Row
13: Make 2 slip stitches in the
next two stitches (we don't start in the first stitch, as we've been doing until
now)
Cut
the yarn, leaving enough tail to secure with 1 knot, and pull through the loop.
Pass the yarn to the back of the heart, inserting the hook through the back
loop of the next stitch. Then pass the crochet hook or yarn needle through the
front of one of the stitches to make the knot away from the edge.
Before continuing, hide the starting thread by passing it through the stitches on the side to keep it concealed.


Before continuing, we hide the starting strand by passing it between the stitches on the side to keep it concealed.


Second side heart
Make
another part exactly like the previous one, but do not cut the yarn at the end
of the row 13.
Hide
the yarn end from the start of round 1 so that it doesn't interfere when
joining both parts.
Set
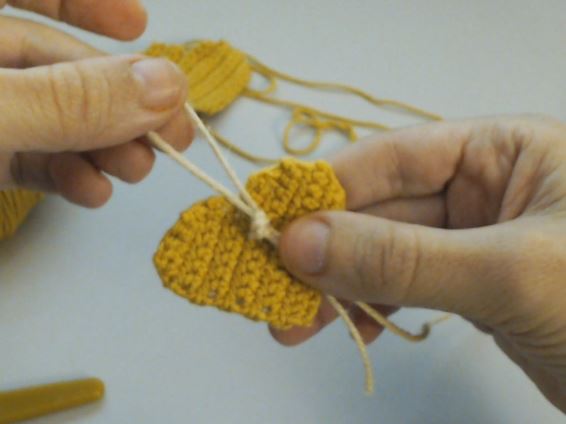
aside, and let's prepare the cord that will go inside before continuing.
Prepare the twine
I
have used raffia thread, but you can use any type of thread or twine. First,
visually estimate the length you want for your upper loop and tie a knot to
secure it. The knot will remain inside the heart.
At the bottom, we place the decoration we have; I've used some beads from a necklace that broke. Surely, you have something on hand at home to recycle, or if not, you can find something in craft stores. Our decoration doesn't have to be glued to the heart; it should have a little margin, between half a centimeter to 1 centimeter.


We join both halves
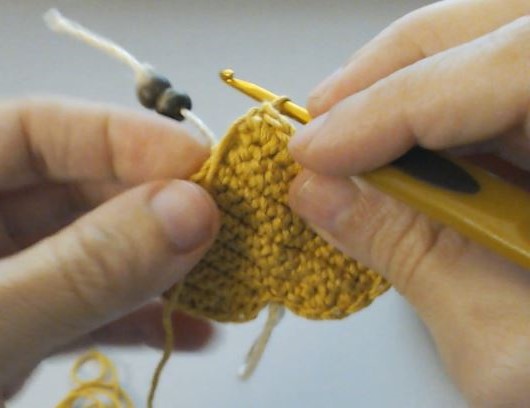
Without tightening the stitches too much, we are going to make single crochets to join both halves, except in the center where we will make slip stitches.
(Notice that the part where the final knot of the first heart is, does not end up on the outer side)
Pass the crochet hook through the gaps you find and pick up the entire stitch from both sides.
At the stitch just before reaching the center stitch and at the center stitch, make 1 slip stitch in each stitch.


Insert our raffia thread (or the one you are using) into the heart, as close to the center as possible, and in the next stitch, make 1 slip stitch. The idea is for the raffia thread to be 'trapped' between the center thread and our last slip stitch.

Continue making single crochets until reaching the bottom tip. When we have reached the end and have made the single crochet, we are going to place the lower cord as we did with the upper one.
First,
attach the cord as much as you can to the center, pass the yarn you are
knitting with in front of the raffia cord, and make a single crochet in the
same stitch.


We continue making single crochets, but don't close completely without having inserted the filling. Make sure the filling reaches the ends of the tip and the upper circular part.
Finish closing by making single crochets and end with 1 slip stitch when you reach the first stitch you made to start closing.
Secure with 1 knot and with a yarn needle, pass it through the body to hide the thread and the knot.
If you enjoy my content and would like to support me, you can invite me for a coffee. Your contribution is greatly appreciated and helps me continue creating 🤗☕
Sign up for the newsletter, and I'll notify you when there's a new amigurumi!